GCP Deployment Overview
You can deploy the Cado platform within your GCP cloud environment via a Terraform Script. When you deploy the platform, it creates its own isolated network in which you can control who has access. From start to finish, you can be up and running in under 25 minutes.
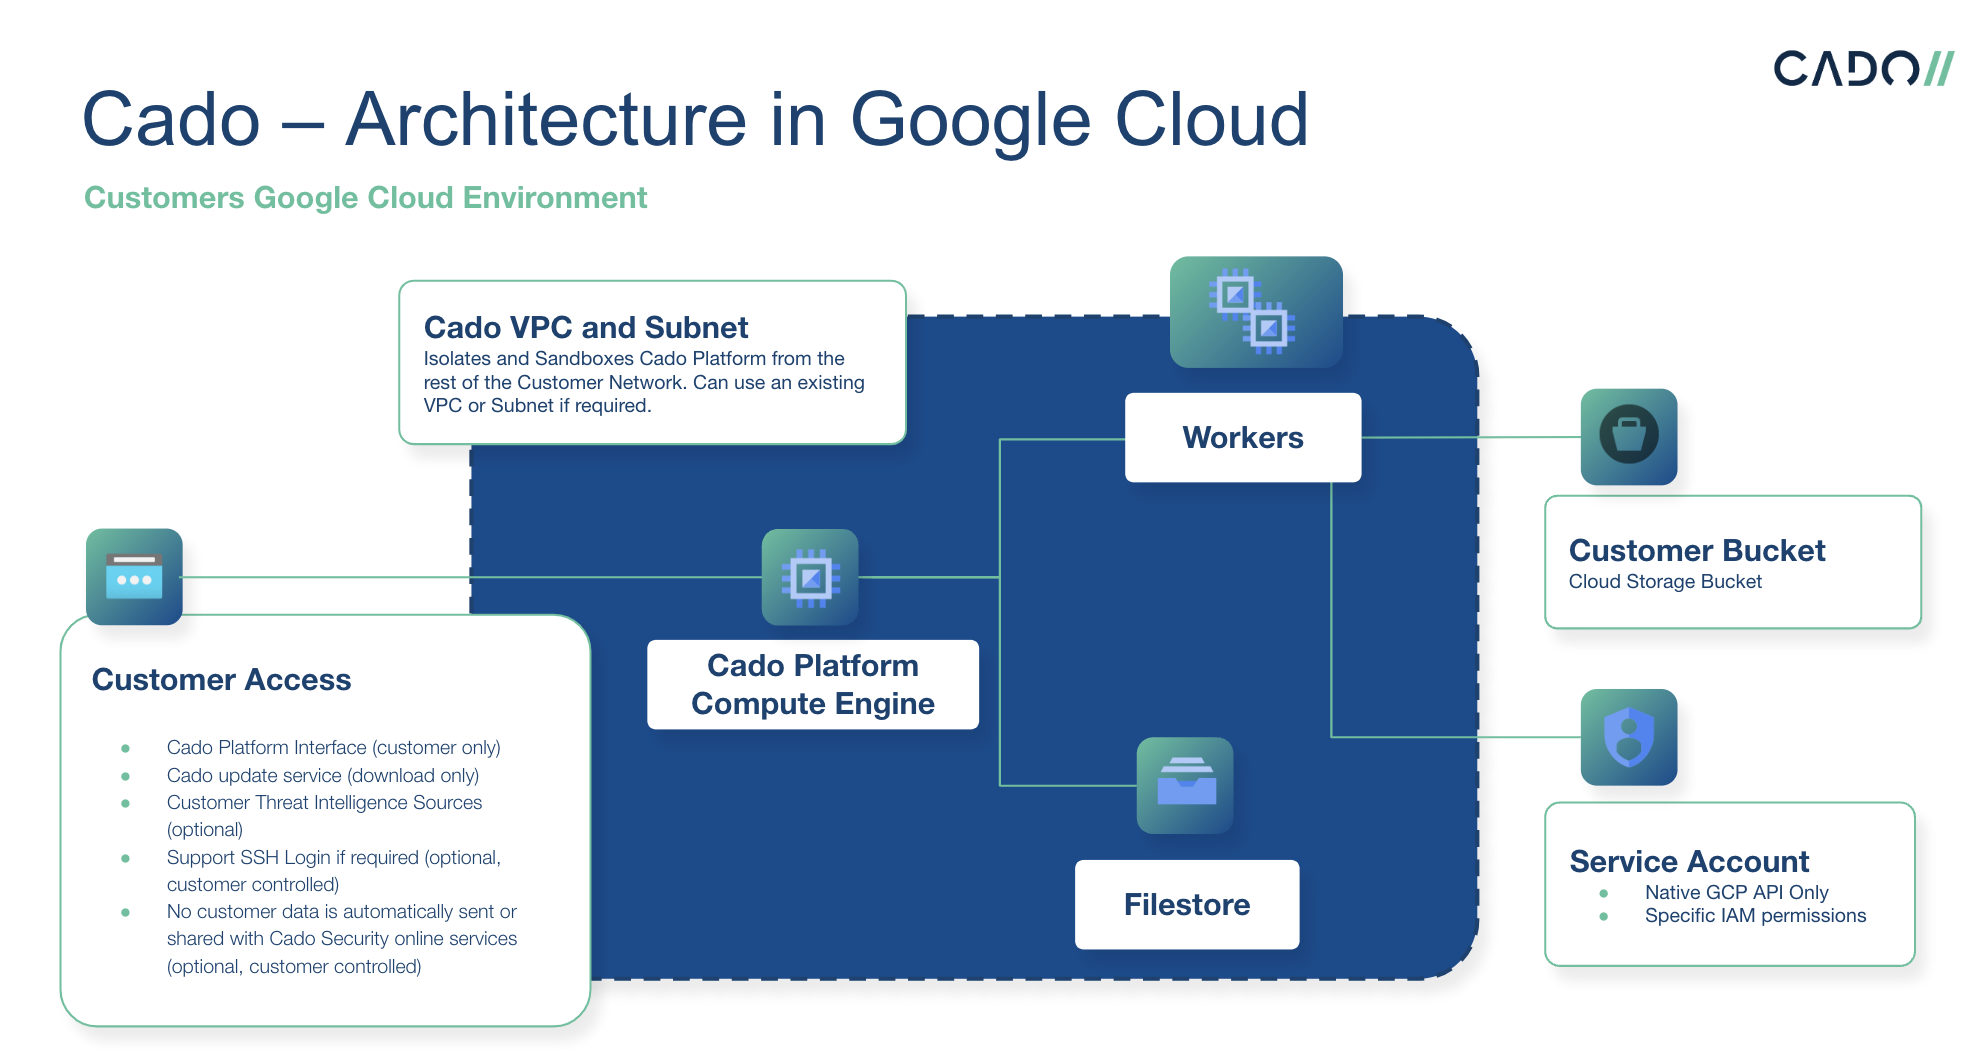 This diagram is a simplified architecture, with options for alternate network access.
For a diagram of how cross-cloud imports from GCP into AWS work, please see our Knowledge Base.
This diagram is a simplified architecture, with options for alternate network access.
For a diagram of how cross-cloud imports from GCP into AWS work, please see our Knowledge Base.
GCP Terraform Script
To set up Cado in GCP you can deploy via our Terraform script. The Terraform script automates the process of configuring the platform stack. Visit the GCP Marketplace listing here to download the latest Terraform code.
Once you have downloaded the Terraform code from the Marketplace listing above, continue on to the steps below.
-
Install Terraform, if you have not already.
-
Install GCloud CLI, if you have not already.
-
Create a project and generate some service account credentials for the project, exporting the credentials.json. To create and use a service account, the user account will need Service Account User and Service Account Admin roles. The service account itself will need to have the following roles:
- Compute Admin
- Service Account User
- Storage Admin
- Cloud Filestore Editor
- Role Administrator
- Security Admin
-
Ensure the following APIs are enabled in the project:
-
Run
gcloud auth activate-service-account --key-file <key_file>where key_file is the path to your GCP service account credentials.json. -
Run
gcloud config set project <project_id> -
Extract gcp.zip This is the ZIP that was provided by Cado Sales, or downloaded from the GCP Marketplace, or cloned from https://github.com/cado-security/Deployment-Templates/tree/main/gcp
-
Change directories into gcp/ which was extracted in the previous step.
-
Customize the file
gcpVars.tfvarsby filling in values:Parameter Name Description Example unique_nameA string to ensure that resources created by Cado are unique cadocredentials_filePath to your GCP service account credentials json ../credentials.jsonproject_idID of the project Cado will be deployed into cado-12839regionThe region which Cado will be deployed to us-east1imageThe link of the image provided by Cado https://www.googleapis.com/compute/v1/projects/cado-public/global/images/cadoresponse-xxxtagsTags to be applied to your Cado instance {tag1 = "cado-test"}vm_sizeSize of main instance n2d-standard-8vol_sizeSize of main instance local disk in GB This value is dependent on the amount of data you will be processing into the Cado platform. Please speak with the sales or support team for proper sizing. allowed_ipsList of incoming IPs [“1.2.3.6/32”]tipWe recommend a minimum setting of 500GB for
vol_size. The instance will roughly need to be sized to be 20% of the amount of data you intend to be on the platform at once. For example, to have 5TB of disk images imported you will need approximately 1000GB of disk space. Projects can always be deleted to recover space. -
Deploy by running the following commands in the directory
gcp/terraform initfollowed byterraform plan -var-file=gcpVars.tfvars. Once you confirm the plan looks correct, you can then runterraform apply -var-file=gcpVars.tfvars -
Find your Cado instance in the Compute Engine portal, navigate to its public IP address in the browser
-
Login with:
- Username: admin
- Password: <instance_id> (found in the Compute Engine console for your instance e.g. 8784481508256766876)