Azure Deployment Overview
Intended Audience and Operating Environment Requirements: This information is written for proficient Azure cloud administrators who are familiar with Azure technology and cloud operations. This manual assumes familiarity with MS Azure, including: Subscriptions, Resource Groups, Virtual Machines, Storage Accounts, and Storage Containers.
Deployment of the Cado platform is performed within your Azure cloud environment via a Terraform Script. When the platform is deployed, it creates its own isolated network in which you can control who has access. From start to finish, you can be up and running in under 25 minutes.
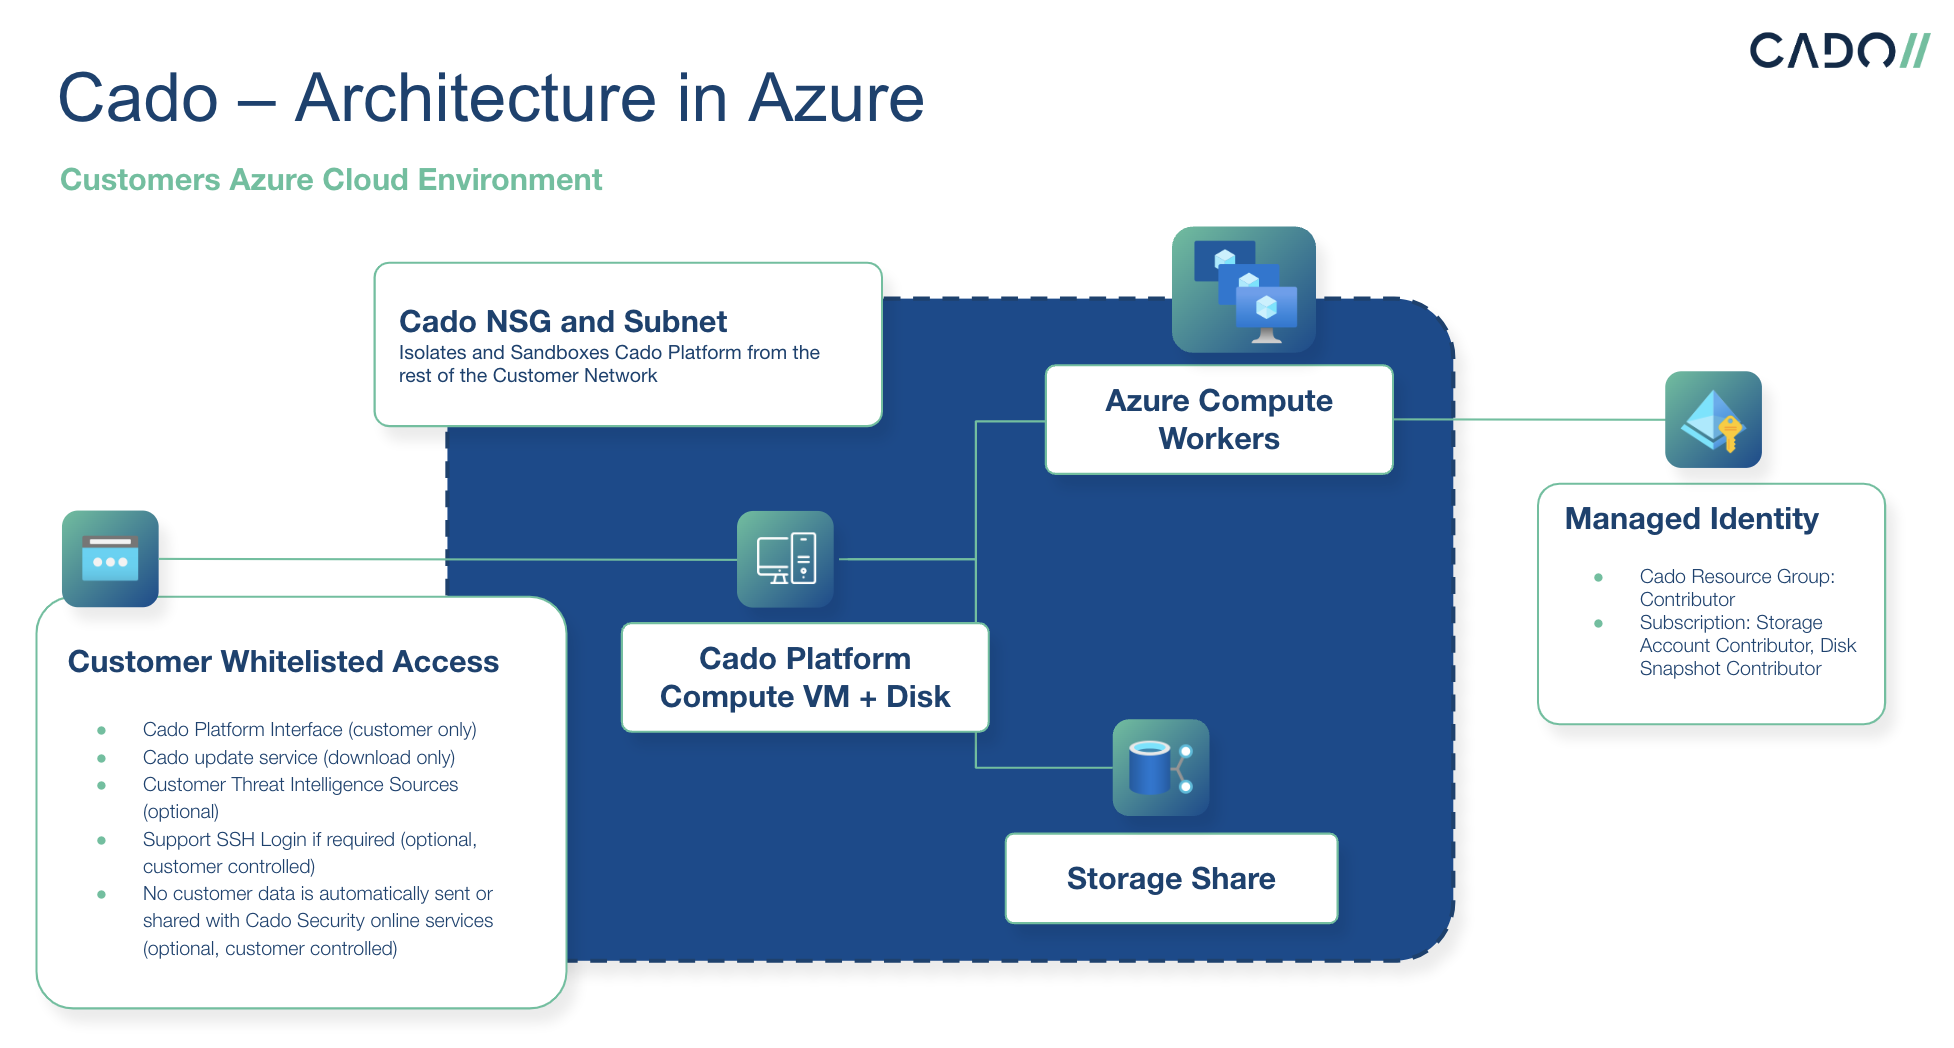 This diagram is a simplified architecture, with options for alternate network access.
For a diagram of how cross-cloud imports from Azure into AWS work, please see our Knowledge Base.
This diagram is a simplified architecture, with options for alternate network access.
For a diagram of how cross-cloud imports from Azure into AWS work, please see our Knowledge Base.
Azure Terraform Script
To set up Cado in Azure you can deploy via our Terraform script. The Terraform script automates the process of configuring the platform stack.
If you have signed up for a Free Trial or are working with the Cado Sales team already, you should receive the following pieces of information:
- a link to the Cado VHD image
- the latest Cado Terraform module (azure.zip) for deploying into Azure, or clone from https://github.com/cado-security/Deployment-Templates/tree/main/azure
If you have not received the above items, reach out to sales@cadosecurity.com for more details. Once you receive them, continue on to the steps below.
-
Install Terraform, if you have not already.
-
Install Azure CLI, if you have not already.
-
Run 'az login'. The account you log in with will be used to deploy. You should store the Cado VHD in your local Azure container for this account as well.
tipIf you have multiple Subscriptions, please ensure you set the Subscription properly prior to beginning the deployment, as outlined here:
https://registry.terraform.io/providers/hashicorp/azurerm/latest/docs/guides/azure_cli#logging-into-the-azure-clitipDepending on your Azure permissions, you may need to be assigned one or more of the following roles in order to complete the deployment:
- Storage Blob Data Contributor
- Storage Blob Data Reader
- Storage Queue Data Contributor
- Storage Queue Data Reader
-
Create a storage account and container to stage the Cado VHD locally within your Azure tenancy. This will be from where the platform will be deployed. You must copy the image to the same region in which you want to deploy Cado. You can complete these steps using the Azure portal or the Azure CLI
a. Create a resource group, if you do not have one already, for the local download of the VHD using the Azure portal or the Azure CLI as shown below. Note this needs to be less than 6 characters in length:
az group create --resource-group "<AzureResourceGroup>" --location "<AzureRegion>" --subscription "<SubscriptionName>"b. Create a storage account, if you do not have one already, using the Azure portal or the Azure CLI as shown below:
az storage account create --name "<StorageAccountName>" --resource-group "<ResourceGroup>" --location "<AzureRegion>" --sku "Standard_LRS" --subscription "<SubscriptionName>"c. Create a container, if you do not have one already, using the Azure portal or the Azure CLI as shown below:
az storage container create -n "<ContainerName>" -g "<ResourceGroup>" --account-name "<StorageAccountName>" --account-key "<AccountKeyValue>" --subscription "<SubscriptionName>"tipYou can find your storage account's account key by either running the command below or by locating it within the Azure Portal:
- Running the following command:
az storage account keys list --account-name <StorageAccountName>- In the Azure portal, navigate to the resource group that you created, then the storage account, then click Settings > Access keys in your storage account's menu blade to see both primary and secondary access keys. You can then click the Show keys button and copy the Key value. Key values should be enclosed in double quotes if working from within bash. You can also use a connection string or SAS token to authenticate the command. More details on this here: Creating a container in a storage account
-
Copy the VHD to your Azure subscription using the command below. Substitute
$RELEASE_URIwith the VHD URL which was provided by Cado Sales:az storage blob copy start --subscription "<SubscriptionName>" --account-name "<StorageAccountName>" --account-key "<AccountKeyValue>" --destination-blob "cado_response.vhd" --destination-container "<ContainerName>" --source-uri "$RELEASE_URI"cautionWait for the copy operation to complete before moving to the next step. You can check the status of the blob copy by running the
az storage blob showcommand as outlined below. This example is for Windows. You can pipe the same command to grep in Linux. You will know the process is complete when the outputstatusfield changes from pending to successaz storage blob show --account-name "<StorageAccountName>" --account-key "<AccountKeyValue>" --name "cado_response.vhd" --container-name "<ContainerName>" --subscription "<SubscriptionName>" -o yamlc | findstr statustipAlso note that if you need to capture very large disks (>=1tb) you will need to deploy in a region where storage optimized (L) instances are available, e.g. US East.
-
Extract
azure.zipThis is the ZIP that was provided by Cado Sales -
Change directories into
azure/cadowhich was extracted in the previous step. -
Create a public and private ssh key. Make sure the directory exists before running the command and do not use a passphrase:
tipYou will likely need to create the
keysdirectory by runningmkdir ../keysprior to running the next stepssh-keygen -b 4096 -f ../keys/azure_demo_key -q -N "" -
Customize the file
azure/cado/main.tfby filling in the default values for the following variables:Parameter Name Description Example image_idCado VHD blobstore URL. This is the URL to the cado_response.vhd blob within your container storage (created in Step 4c above) . It is in the format: https:// <StorageAccountName>.blob.core.windows.net/ <ContainerName>/ cado_response.vhdand can be found within your Azure Portal by navigating to "Home > Storage accounts", selecting the StorageAccountName, clicking "Storage browser (preview)", clicking the ContainerName, clicking the "cado_response.vhd" blob and viewing the "URL" value.https:// mycadostorage.blob.core.windows.net/ cadocontainer/cado_response.vhdip_pattern_httpsList of incoming IPs permitted to access HTTPS. CIDR or source IP range or * to match any IP. At least one value is required. ["1.2.3.4/32","1.2.3.5/32"]ip_pattern_allList of incoming IPs permitted to access HTTPS and SSH. CIDR or source IP range or * to match any IP. At least one value is required. This should be the CIDR of the machine that is running the Terraform deployment script. ["1.2.3.6/32"]instance_typeInstance type to use for main Recommended to use Standard_D16ds_v4If you have questions on instance sizing, please contact support for guidance.resource_groupResource group name which will be created. This resource group name must not exist already resgroup123regionRegion to deploy in. You can use the Display Name or Name of the region as shown when running az account list-locations -o tableNorth Europe,northeurope,East US,eastusshare_sizeSize of network file share 500This value is depenedent on the amount of data you will be processing into the Cado platform. Please speak with the sales or support team for proper sizing.main_sizeSize of main instance local disk in GB 30Do not changemain_data_sizeSize of main instance local disk in GB 500This value is depenedent on the amount of data you will be processing into the Cado platform. Please speak with the sales or support team for proper sizing.processing_modeProcessing mode to start in scalable-vmDo not changessh_key_publicPath to SSH public key ../keys/azure_demo_key.pubssh_key_privatePath to SSH private key ../keys/azure_demo_keyfinalize_cmdFinalize command echo 'not required'Do not changetipWe recommend a minimum setting of 500GB for
main_data_size. The instance will roughly need to be sized to be 20% of the amount of data you intend to be on the platform at once. For example, to have 5TB of disk images imported you will need approximately 1000GB of disk space. Projects can always be deleted to recover space. -
Deploy by running the following commands in the directory
azure/cado/terraform initfollowed byterraform plan. Once you confirm the plan looks correct, you can then runterraform apply -
Make a note of the IP Address and the full Resource Id (/subscription/.../cado-main-vm) in the logs e.g.:
module.cado_scalable.azurerm_linux_virtual_machine.vm (remote-exec): public_ip = 1.2.3.4
module.cado_scalable.azurerm_linux_virtual_machine.vm: Creation complete after 1m53s [id=/subscriptions/2f34c608-91b5-4d14-ac36-b8e0377fbcca/resourceGroups/new_res_three/providers/Microsoft.Compute/virtualMachines/cado-main-vm]
The Resource ID can also be found within your Azure Portal by navigating to Home > Virtual Machines, clicking on the Cado VM name, then clicking Properties on the left navigation bar. Scroll down to find the Resource ID.
It will take about 20 minutes to deploy, then you can Log into Cado
After deployment, you can import Test Data from the Help menu to confirm that the deployment was successful.
When deploying, the main Cado instance will have the name CadoResponse. If you rename your Cado instance, please ensure the name starts with CadoResponse, otherwise the default update mechanism may not work properly due to how permissions are configured.
How to Add Tags to Resources
Please see the guide on Deployment Options
If you receive the error "The Cado platform in Azure will not start with the error: The client with object id does not have authorization to perform action 'Microsoft.Storage/storageAccounts/read'"
If you find the Cado platform in Azure will not start with the error:
The client $client with object id $object does not have authorization to perform action 'Microsoft.Storage/storageAccounts/read' over scope $subscription or the scope is invalid. If access was recently granted, please refresh your credentials.
Please resolve by:
- Find the cado-main-vm in the azure portal
- Go to the Identity section
- You should see 'system assigned' is off, and 'user assigned' has a single entry 'cado-identity'
- Remove any extra managed and switch system assigned to off
- Then, reboot cado-main-vm and it will use the correct policy