Azure AD OAuth Integration
warning
If you encounter issues, please contact support@cadosecurity.com describing your issue and providing as much detail about your configuration as possible.
You can now enable the beta of Azure AD OAuth Integration in the Cado platform by going to "Settings > SSO > Microsoft OAuth".
Setting up Azure AD SSO
- Open Azure portal and navigate to Enterprise Applications
- Click New Application
- Click Create your own application
- Enter a name (e.g. Cado)
- Select
Integrate any other application you don't find in the gallery (Non-gallery)
- Make a note of the Application ID
tip
Optional: Create a role to allow Azure AD users to be assigned admin privileges
- From the home page, open Azure Active Directory and select the App Registrations blade
- Select your application (you may need to switch to the All Applications tab if you are not an owner)
- Select App roles then Create app role.
- Set the role value, in this example it will be called,
admin, but you can name this as you like. Just make note of what you call this; you'll need it later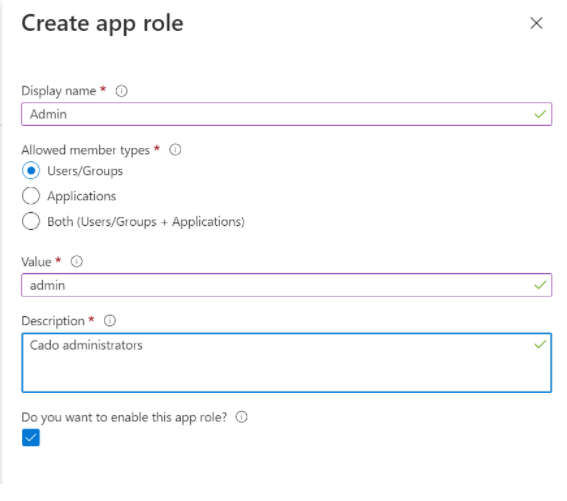
- Configure Access Control
- Navigate to Enterprise Applications and select the Properties blade and make sure User assignment required? is set to
Yes. This means only assigned users will be allowed to log into Cado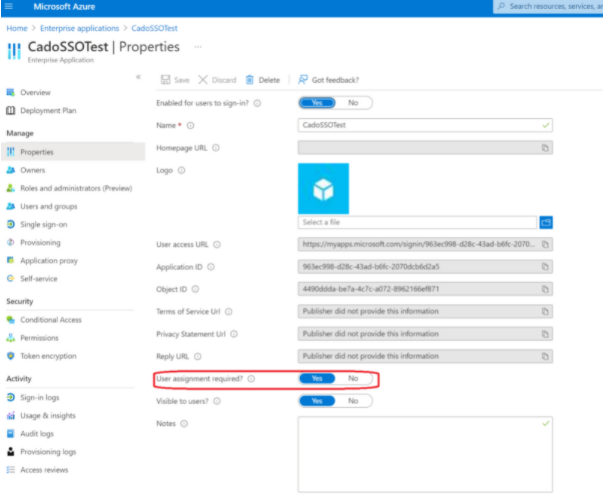
- Navigate to Users and Groups
- Click Add User/Group and add any users you want to give access to the app. If you created an admin role, you can assign the new users the admin role to give them admin access within Cado.
- Navigate to Enterprise Applications and select the Properties blade and make sure User assignment required? is set to
- Create a secret to allow authentication with Cado
- From the home page, open Azure Active Directory and select the App Registrations blade
- Select your application (you may need to switch to the All Applications tab if you are not an owner)
- Select the Clients & Secrets blade and click New Client Secret
- Make a note of the Value, you will need this in Cado.
- Collect other required information
- Select the Overview blade and make a note of the following values:
Application Client IDDirectory (Tenant) IDClient Secret(which you should already have from previous step)
- Select the Overview blade and make a note of the following values:
- Whitelist the redirect URL
- Select the Authentication blade
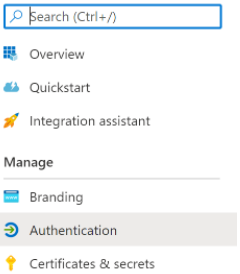
- Click Add a Platform
- Select Web and input your redirect url. This should be the url you use to access Cado in the web browser, including the
/loginpath. Example:https://my.cado.instance/login
- Select the Authentication blade
- Configure SSO in the Cado platform
- Open your Cado instance and log in as an admin user
- Go to Settings > SSO > Microsoft OAuth
- Enter the Microsoft OAuth details you noted earlier
- In the
Admin Group Nameenter in the value you configured in step 4 - Click Update