Tines Integration
Tines is a no-code automation platform for security analysts. Tines allows analysts to spend less time on routine repetitive tasks and allow them to focus on those areas where they can have the most impact. The tools feature pre-configured integrations with a variety of business and security tools, but for more sophisticated users, it also features the ability to hook into any publicly available API, including the Cado API.
By using the Cado Response integration with Tines, we're allowing security analysts to quickly automate Incident Response and allow them to quickly respond to attacks for further investigation in the Cado Response platform. The Tines and Cado Response integration is easy to use, just search for Cado Security in the Public Templates repository, choose, and then drag and drop.
Fore more information, see our blog on Automating Incident Response with Tines and Cado Response.
If you're confused by the terminology mentioned here, or have never used Tines before, please consider checking out the Tines documentation.
Getting Started with Tines
Before properly getting started please see the following for general instructions on setting up the Cado Response platform for integrating with third-party tools:
Contents
- Creating and Storing an API Access Key
- Adding your Platform Base URL
- Adding Default Values
- Testing your Settings
Creating and Storing an API Access Key
Cado Response allows you to create an API Access Key that allows third-party services to authenticate and interact with a Cado Response instance; you'll need to create one in order to use Tines with Cado Response.
Please see Creating and Storing an API Access Key to learn how to create the API Access Key.
In order to add the Secret Key to Tines, you'll need to open your Tines Dashboard, and go to the Credentials page. Add a new Text Credential and name it CadoResponse_APIKey.
It's important to name all credentials and resources mentioned in the tutorial as given, or else the Actions we provide won't be able to interact with the Cado API.
Adding your Platform Base URL
To tell Tines the Platform Base URL of a Cado Response instance, you'll need to add it as a Resource. In order to do this, you'll need to open your Tines Dashboard, and go to the Resources page. Click the New Resource button and name it Cadoresponse_URL and paste the Platform Base URL into the builder.
Adding Default Values
The actions we provide allow you to set default fallback values, in case a form doesn't get filled in properly, or if an analyst misconfigures an action. To add these values, simply create three Resources with the following names:
| Resource Name | Type | Example | Description |
|---|---|---|---|
CadoResponse_Default_Project_ID | Integer | 1 | A numerical value that denotes a project in Cado Response. |
CadoResponse_Default_Region | String | us-east-1 | A valid name of an AWS region. |
CadoResponse_Default_S3_Bucket | String | bucket_name | A name of a valid and accessible S3 bucket. |
Testing your Settings
To make sure you've done all the following steps correctly, please follow along with the following test procedure:
- Create a new story in Tines through the Tines Dashboard.
- Drag the List Cado Response Projects HTTP Request template from the Public Templates repository in the left-hand sidebar.
- Click the new action and click Run.
- Check the Action Events for a
200 OKHTTP code.
If the following was successful, then you've correctly setup Tines to interact with the Cado Response API.
List of Actions
Actions are the basic actions that can be chained together in Stories, which are playbooks that can be run to perform a specific task or workflow.
All the list actions are available in the Tines Public Templates repository. Just search for Cado Security, choose the action and drag and drop.
Contents
- List EC2 Instances
- List S3 Buckets
- List Projects
- List Project Pipelines
- Create a Project
- Retrieve a Pipeline
- Acquire a Disk Image From EC2
- Acquire a Disk Image From S3

List EC2 Instances
- Template Name:
List EC2 Instances in Cado Response - Description: This action will allow you to list all the EC2 instances in an AWS region.
- Default URL:
https://{{.RESOURCE.cadoresponse_url}}/api/v2/projects/{{ .projectID | default: .RESOURCE.cadoresponse_default_project_id }}/imports/ec2
Changing the Default URL
As this API endpoint requires a Project ID you'll need to change the URL field to reflect this by changing the .projectID placeholder with a valid Project ID from Cado Response.
For example https://{{.RESOURCE.cadoresponse_url}}/api/v2/projects/{{ .projectID | default: .RESOURCE.cadoresponse_default_project_id }}/imports/ec2 would become: https://{{.RESOURCE.cadoresponse_url}}/api/v2/projects/2/imports/ec2 for Project ID 2.
Changing the Payload Parameters
You'll also need to adjust the region parameter in the Payload to the valid AWS region you want to see instances listed in.
List S3 Buckets
- Template Name:
List S3 Buckets in Cado Response - Description: This action will allow you to list all the S3 buckets in an AWS account.
- Default URL:
https://{{.RESOURCE.cadoresponse_url}}/api/v2/projects/{{ .projectID | default: .RESOURCE.cadoresponse_default_project_id }}/imports/s3
Changing the Default URL
As this API endpoint requires a Project ID you'll need to change the URL field to reflect this by changing the .projectID placeholder with a valid Project ID from Cado Response.
For example https://{{.RESOURCE.cadoresponse_url}}/api/v2/projects/{{ .projectID | default: .RESOURCE.cadoresponse_default_project_id }}/imports/s3 would become: https://{{.RESOURCE.cadoresponse_url}}/api/v2/projects/2/imports/s3 for Project ID 2.
List Projects
- Template Name:
List Cado Response Projects - Description: This action will allow you to list all the projects in Cado Response.
- Default URL:
https://{{.RESOURCE.cadoresponse_url}}/api/v2/projects
List Project Pipelines
- Template Name:
List Pipelines for a Cado Response Project - Description: This action will allow you to list all the pipelines for a given project in Cado Response.
- Default URL:
https://{{.RESOURCE.cadoresponse_url}}/api/v2/tasks/pipelines
Changing the Payload Parameters
You'll need to change the project_id parameter in the Payload to a valid Cado Response Project ID.
Create a Project
- Template Name:
Create a new Project in Cado Response - Description: This action will allow you to create a new project in Cado Response.
- Default URL:
https://{.RESOURCE.cadoresponse_url}}/api/v2/projects
Changing the Payload Parameters-
In the Payload section you need to change the caseName parameter to the name of the project you desire. You can also change the description parameter to add a description to your project, or remove it if you don't need one. If you don't add the caseName parameter, the action will default to the current UNIX timestamp as the project name. All projects created through Tines will include the _TinesProject suffix.
Extracting the Return Value
This action will return the newly created Project ID in the response body. You can use an Event Transform action with the following settings:
{
    "mode": "extract",
    "matchers": [
        {
            "path": "{{ .create_a_new_project_in_cado_response.body.id}}",
            "regexp": "\\d*",
            "to": "created_project_id"
        }
    ]
}
You can then retrieve the value from other actions using the following:
{{ .get_new_project_id.created_project_id | first }}
where get_new_project_id is the name of the appropriate Event Transform action in Liquid syntax.
Retrieve a Pipeline
- Template Name:
Get Details for a Pipeline in Cado Response - Description: This action will retrieve the details of a specific pipeline, including all subtasks.
- Default URL:
https://{{.RESOURCE.cadoresponse_url}}/api/v2/tasks/pipelines
Changing the Payload Parameters-
You'll need to change the project_id parameter in the Payload to a valid Cado Response Project ID.
You'll need to change the pipeline_id parameter in the Payload to a valid Pipeline ID (see Acquisition for more on how to retrieve a Pipeline ID)
Acquire a Disk Image From EC2
- Template Name:
Trigger an EC2 Disk Acquisition in Cado Response - Description: This action will trigger a disk image acquisition task in Cado Response for a specified EC2 instance.
- Default URL:
https://{{.RESOURCE.cadoresponse_url}}/api/v2/projects/{{ .projectID | default: .RESOURCE.cadoresponse_default_project_id }}/imports/ec2
Changing the Default URL
As this API endpoint requires a Project ID you'll need to change the URL field to reflect this by changing the .projectID placeholder with a valid Project ID from Cado Response.
For example https://{{.RESOURCE.cadoresponse_url}}/api/v2/projects/{{ .projectID | default: .RESOURCE.cadoresponse_default_project_id }}/imports/ec2 would become: https://{{.RESOURCE.cadoresponse_url}}/api/v2/projects/2/imports/ec2 for Project ID 2.
Changing the Payload Parameters-
You'll need to change the instance_id and region parameters in the Payload to the appropriate values of the EC2 instance you want to acquire.
You can include the following optional parameter bucket in the Payload to change which S3 bucket the disk image is uploaded to.
Likewise, you can also provide the following optional parameters in the Payload to change the way Cado Response will acquire the disk image. These are the options and their default values:
    "compress": true,
    "include_disks": true,
    "include_hash": false,
    "include_logs": true,
    "include_screenshot": true,
Extracting the Return Value
This action will return the newly created Pipeline ID in the response body. You can use an Event Transform action with the following settings:
{
    "mode": "extract",
    "matchers": [
        {
            "path": "{{ .trigger_an_ec2_disk_acquisition_in_cado_response.body.pipeline_id}} }}",
            "regexp": "\\d*",
            "to": "created_pipeline_id"
        }
    ]
}
You can then retrieve the value from other actions using the following:
{{ .get_new_pipeline_id.created_pipeline_id | first }}
where get_new_pipeline_id is the name of the appropriate Event Transform action in Liquid syntax.
Acquire a Disk Image From S3
- Template Name: `Trigger an S3 Disk Acquisition in Cado Response
- Description: This action will trigger a disk image acquisition task in Cado Response from a file in a S3 Bucket.
- Default URL:
https://{{.RESOURCE.cadoresponse_url}}/api/v2/projects/{{ .projectID | default: .RESOURCE.cadoresponse_default_project_id }}/imports/s3
Changing the Default URL
As this API endpoint requires a Project ID you'll need to change the URL field to reflect this by changing the .projectID placeholder with a valid Project ID from Cado Response.
For example https://{{.RESOURCE.cadoresponse_url}}/api/v2/projects/{{ .projectID | default: .RESOURCE.cadoresponse_default_project_id }}/imports/s3 would become: https://{{.RESOURCE.cadoresponse_url}}/api/v2/projects/2/imports/s3 for Project ID 2.
Changing the Payload Parameters-
You'll need to change the bucket and file_name parameters in the Payload to the appropriate values of the file in the S3 bucket you want to acquire and process.
Extracting the Return Value
This action will return the newly created Pipeline ID in the response body. You can use an Event Transform action with the following settings:
{
    "mode": "extract",
    "matchers": [
        {
            "path": "{{ .trigger_an_s3_disk_acquisition_in_cado_response.body.pipelines[0].pipeline_id}} }}",
            "regexp": "\\d*",
            "to": "created_pipeline_id"
        }
    ]
}
You can then retrieve the value from other actions using the following:
{{ .get_new_pipeline_id.created_pipeline_id | first }}
where get_new_pipeline_id is the name of the appropriate Event Transform action in Liquid syntax.
Creating a Story: Acquiring an EC2 Instance
If you have a good grasp of the basics of Tines, feel free to skip this section.
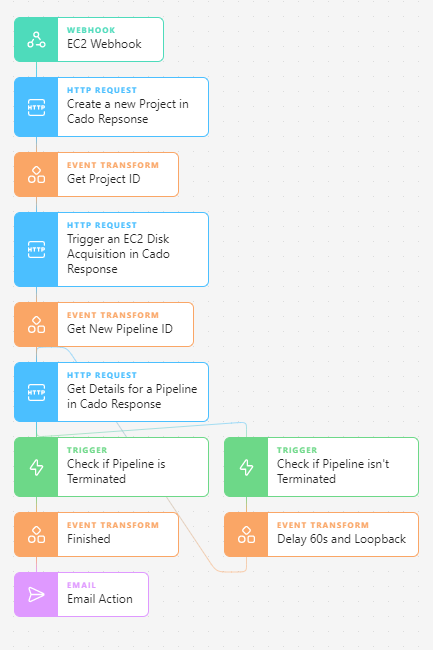
This section covers a quick tutorial in creating a basic workflow (or story in Tines terms) that:
- Allows users to specify details in a form
- Creates a new Project
- Triggers an EC2 Disk Acquisition
- Loops over a pipeline until it has been terminated
- Emails the user a success message
You can download the finished story example here: ** Cado Response Basic Story: Create a Project and Acquire EC2 Disk > **
Contents
Creating the Form
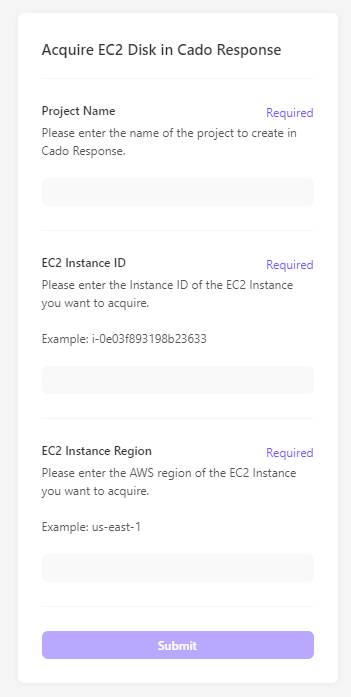
To create a form in Tines, head to the story editor and click the Form tab. Using the sidebar, add 4 text fields:
- One for the new Project Name. Name this field
Project Nameand make it required. - One for the EC2 Instance ID. Name this field
EC2 Instance IDand make it required. - One for the EC2 Instance Region. Name this field
EC2 Instance Regionand make it required. - One fort the email address of the user. Name this field
Email Addressand make it required.
We'll use these values throughout the rest of this tutorial, so make sure the names match as above.
Go back to the Story tab inside the story editor and drag a new Webhook action to the story. Change its name to EC2 Webhook. After this, go back into the Form tab and change the Receiving Action in the sidebar to EC2 Webhook. This will allow your story to retrieve values from the form.
Action: Creating the Project
Return to the Story tab inside the story editor, and drag a Create a new Project in Cado Response action from the Public Templates repository in the left-hand sidebar and create a connection from the EC2 Webhook action to it.
Modify the Payload section to match the following: (It may be easier to switch to the Plain Code view and paste this in)
{
    "caseName": "{{.ec2_webhook.body.project_name | default: \"now\" | date: \"%s\" | append: \"_TinesProject\" }}",
}
This JSON code will retrieve the project name from the form, and will send it to the Cado Response API. You can optionally add the description parameter to the Payload to give your new project a description.
This action will return the newly created Project ID in the response body. In order to retrieve this value, we need to use an Event Transform which allow us to modify, extract and process responses and data from events. Drag an Event Transform action and name it Get Project ID. Create a connection from the Create a new Project in Cado Response action to it. Then modify the Editor section to match the following:
{
    "mode": "extract",
    "matchers": [
        {
            "path": "{{ .create_a_new_project_in_cado_response.body.id}}",
            "regexp": "\\d*",
            "to": "created_project_id"
        }
    ]
}
This JSON will extract the Project ID from the previous response, and will store it in the {{ .get_project_id.created_project_id | first }} variable.
Action: Triggering a EC2 Acquisition
Drag a Trigger an EC2 Disk Acquisition in Cado Response action from the Public Templates repository in the left-hand sidebar and create a connection from the Get Project ID action.
Modify the URL to the following: {{.RESOURCE.cadoresponse_url}}/api/v2/projects/{{.get_project_id.created_project_id | first }}/imports/ec2 to use the Project ID that was generated earlier on in the workflow.
Modify the Payload section to match the following: (It may be easier to switch to the Plain Code view and paste this in)
{
    "compress": "true",
    "include_disks": "true",
    "include_hash": "false",
    "include_logs": "true",
    "include_screenshot": "true",
    "instance_id": "{{.ec2_webhook.body.ec2_instance_id}}",
    "bucket": "{{ .bucket | default: .RESOURCE.cadoresponse_default_s3_bucket }}",
    "region": "{{.ec2_webhook.body.ec2_instance_region}}"
}
Change BUCKET_NAME into the code into an appropriate S3 bucket!
This JSON code will tell Cado Response to acquire the disk from the EC2 instance described in the form, using the default acquisition settings.
This action will return the newly created Pipeline ID in the response body. In order to retrieve this value, drag an Event Transform action and name it Get Pipeline ID. Create a connection from the Trigger an EC2 Disk Acquisition in Cado Response action to it. Then modify the Editor section to match the following:
{
    "mode": "extract",
    "matchers": [
        {
           "path": "{{ .trigger_an_ec2_disk_acquisition_in_cado_response.body.pipeline_id}} }}",
           "regexp": "\\d*",
           "to": "created_pipeline_id"
        }
    ]
}
This JSON will extract the Pipeline ID from the previous response, and will store it in the {{ .get_pipeline_id.created_pipeline_id | first }} variable.
Action: Looping over Pipeline Status
This is the most complicated part of this example, as it requires a loop, which we can achieve by using two Trigger actions. First, drag a Get Details for a Pipeline in Cado Response action from the Public Templates repository in the left-hand sidebar and create a connection from the Get Pipeline ID action.
Modify the Payload section to match the following: (It may be easier to switch to the Plain Code view and paste this in)
{
    "project_id": "{{.get_project_id.created_project_id | first }}",
    "pipeline_id": "{{ .get_new_pipeline_id.created_pipeline_id | first }}"
}
This JSON code will retrieve the new Project and Pipeline ID and will tell Cado Response which Pipeline we need to retrieve.
In order to create a loop, we need to drag two Trigger actions to the story. Name one Check if Pipeline is Terminated, and the other Check if Pipeline isn't Terminated. Create a connection from the Get Details for a Pipeline in Cado Response action for each of them.
In the Check if Pipeline is Terminated action, modify the Editor section to match the following:
{
    "rules": [
        {
            "type": "regex",
            "value": "true",
            "path": "{{ .get_details_for_a_pipeline_in_cado_response.body[0].terminated }}"
        }
    ]
}
This JSON code will check if the pipeline has the terminated flag set to true. Meaning the pipeline has finished.
In the Check if Pipeline isn't Terminated action, modify the Editor section to match the following:
{
    "rules": [
        {
            "type": "regex",
            "value": "false",
            "path": "{{ .get_details_for_a_pipeline_in_cado_response.body[0].terminated }}"
        }
    ]
}
This JSON code will check if the pipeline has the terminated flag set to false. Meaning the pipeline hasn't finished.
Once you have done that, we can re-trigger the Get Details for a Pipeline in Cado Response by dragging an Event Transform action to the story and making a connection from the Check if Pipeline isn't Terminated action to it. Then you can modify the Editor to match the following:
{
    "mode": "delay",
    "seconds": 60
}
This will stop execution for 60 seconds, and by creating a connection from it back to the Get Details for a Pipeline in Cado Response action, we can effectively create a looping function. However, every good loop must have an exit condition, which is the role of Check if Pipeline is Terminated.
Action: Sending an Email
Once the Pipeline has finished, we'll want to email the user saying the pipeline has finished. To do this, drag an Email action from the sidebar to the story and make a connection from the Check if Pipeline is Terminated action. Once done, modify the Editor to match the following:
{
    "recipients": "{{.ec2_webhook.body.email_address}}",
    "subject": "Tines: EC2 Acquisition is finished",
    "body": "Pipeline has finished!"
}
This will send an email address to the email address given to the form, notifying the user the pipeline has finished.
You've now made the example workflow, to test it out, click on the Form tab in the story editor and submit. Once done, you'll need to manually emit the form response in the EC2 Webhook action, by clicking and going to the Events tab in the right-hand sidebar, and clicking emit on the most recent held event.