This section is not relevant to SaaS deployments - Please see AAISP documentation on SSO.
How to Set Up the Okta OAuth Integration
You can enable the Okta OAuth Integration beta in the / Forensic Acquisition and Investigation platform by navigating to Settings > SSO > Okta OAuth.
Setting up Okta SSO
-
Open the Okta admin dashboard and go to
Applications > Applications. -
Click Create App Integration.
-
Select:
- OIDC - OpenID Connect
- Web Application
-
Click Next.
-
Name the / Forensic Acquisition and Investigation OAuth app.
-
Add a Sign-in Redirect URI. This should be the URL you use to access / Forensic Acquisition and Investigation, followed by
/login(e.g., https://my.cado.instance/login). -
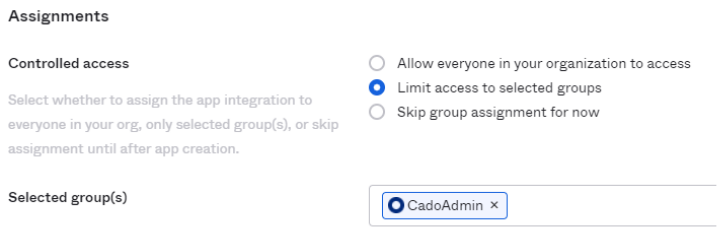
Select who will have access to the application:
- In Assignments, choose Limit access to selected groups.
- Add a user group. You can assign users later if needed.
- In this example, the admin group is named
CadoAdmin, but you can use any name. Keep note of it for later steps.
To assign non-admin users within / Forensic Acquisition and Investigation, create a group with a different name (e.g., CadoNonAdmin), and users in that group will be Normal Users in the / Forensic Acquisition and Investigation platform.
-
To adjust access control later, go to the Assignments tab of the OAuth application, where you can add individuals or groups. Only users in the
CadoAdmingroup will have admin status in / Forensic Acquisition and Investigation. -
Add a Groups Claim for the application:
- Go to the Sign On tab of the OAuth application.
- Click Edit in the OpenID Connect ID Token section.
- In the Issuer field, specify the Okta URL.
- For Groups claim type, select Filter.
- Set Groups claim filter to groups and enter Matches regex
.*. - Click Save.

-
In the General Settings tab of the OAuth application, note down the
Client ID,Client Secret, andOkta Domain. -
Configure SSO in / Forensic Acquisition and Investigation:
- Log in to your / Forensic Acquisition and Investigation instance as an admin.
- Go to
Settings > SSO > Okta OAuth. - Enter the details from the previous step and click Update. For the domain, add
https://at the beginning and/oauth2at the end. The complete domain should look like this:https://<Your Okta Domain>/oauth2. - Enter the
Admin Group Namevalue from step 7.
Use Admin Group Name to configure the role (Administrator or Analyst) for first login only. Any changes to a users roles from then onwards should be managed in the platform.
- Log out and log in using Okta OAuth.