How to Manage Users and Authentication in / Forensic Acquisition and Investigation
In the / Forensic Acquisition and Investigation platform, you can control user access to both processed data and raw data stored in the cloud, ensuring users only access the data they need.
/ Forensic Acquisition and Investigation Platform Roles
RBAC (Role Based Access) ensures only authorised individuals have access to specific features and data. This is based on permissions defined for the role they are assigned.
User Types
| User Role | Description |
|---|---|
| Administrator | Ability to access all functionality in the / Forensic Acquisition and Investigation platform |
| Platform Administrator | A more restricted set of permissions than Administrator, with a focus on operational aspects of the platform including upgrades, account management, and troubleshooting. |
| Lead Analyst | A restricted set of permissions with a focus on managing investigations including user access and taking response actions |
| Analyst | A more restricted permission set than the Lead Analyst role, with a focus on conducting investigations including acquiring and analysing evidence |
| Read only Analyst | Most restricted role with read only access |
Role Permissions Matrix
The below table is a breakdown of permissions across each of the different roles and their levels of access.
| Permission Group | Permission | Administrator | Platform Administrator | Lead Analyst | Analyst | Read Only Analyst |
|---|---|---|---|---|---|---|
| Response Actions | View response actions | ✅ | ❌ | ✅ | ❌ | ❌ |
| Create/Delete/Update response actions | ✅ | ❌ | ✅ | ❌ | ❌ | |
| Invoke response action | ✅ | ❌ | ✅ | ❌ | ❌ | |
| Alarms | View alarms | ✅ | ❌ | ✅ | ✅ | ✅ |
| Create/Delete alarms | ✅ | ❌ | ✅ | ✅ | ❌ | |
| Audit Log | View and download audit log | ✅ | ✅ | ❌ | ❌ | ❌ |
| View audit log history | ✅ | ✅ | ✅ | ✅ | ✅ | |
| Authentication | Authenticate to the platform | ✅ | ✅ | ✅ | ✅ | ✅ |
| API Keys | View API keys | ✅ | ✅ | ❌ | ❌ | ❌ |
| Create API keys | ✅ | ✅ | ❌ | ❌ | ❌ | |
| Delete API keys | ✅ | ✅ | ❌ | ❌ | ❌ | |
| Cloud Accounts | View cloud accounts | ✅ | ✅ | ✅ | ✅ | ❌ |
| Create/Delete cloud accounts | ✅ | ✅ | ❌ | ❌ | ❌ | |
| Detections | View detections | ✅ | ❌ | ✅ | ✅ | ✅ |
| Export detections | ✅ | ❌ | ✅ | ✅ | ❌ | |
| View detection rules | ✅ | ✅ | ✅ | ❌ | ❌ | |
| Create/Delete/Update detection rules | ✅ | ✅ | ✅ | ❌ | ❌ | |
| Create investigation from detection | ✅ | ❌ | ✅ | ❌ | ❌ | |
| Investigations | View investigation and data associated with investigation | ✅ | ❌ | ✅ | ✅ | ✅ |
| Create/Delete/Update data associated with investigation | ✅ | ❌ | ✅ | ✅ | ❌ | |
| Delete all investigations | ✅ | ❌ | ❌ | ❌ | ❌ | |
| Create investigation | ✅ | ❌ | ✅ | ❌ | ❌ | |
| Delete investigation | ✅ | ❌ | ✅ | ❌ | ❌ | |
| Evidence | Import evidence and data | ✅ | ❌ | ✅ | ✅ | ❌ |
| Download evidence | ✅ | ❌ | ✅ | ✅ | ❌ | |
| License | View platform license | ✅ | ✅ | ✅ | ✅ | ✅ |
| Delete/Update platform license | ✅ | ✅ | ❌ | ❌ | ❌ | |
| Metrics | View platform metrics | ✅ | ❌ | ❌ | ❌ | ❌ |
| Notifications | Delete all notifications | ✅ | ✅ | ❌ | ❌ | ❌ |
| View platform notifications | ✅ | ✅ | ✅ | ✅ | ✅ | |
| Delete specified notification | ✅ | ✅ | ✅ | ✅ | ❌ | |
| Saved Scripts | Invoke saved script and commands | ✅ | ❌ | ✅ | ❌ | ❌ |
| Settings | View intelligence | ✅ | ❌ | ✅ | ❌ | ❌ |
| Delete/Update intelligence | ✅ | ❌ | ✅ | ❌ | ❌ | |
| View settings | ✅ | ✅ | ✅ | ✅ | ✅ | |
| Create/Delete/Update settings | ✅ | ✅ | ❌ | ❌ | ❌ | |
| View authentication settings | ✅ | ✅ | ❌ | ❌ | ❌ | |
| Update authentication settings | ✅ | ✅ | ❌ | ❌ | ❌ | |
| Create/Delete/Update scripts | ✅ | ✅ | ✅ | ❌ | ❌ | |
| View scripts | ✅ | ✅ | ✅ | ❌ | ❌ | |
| Saved Queries | View saved queries | ✅ | ✅ | ✅ | ✅ | ✅ |
| Create/Delete/Update saved queries | ✅ | ✅ | ✅ | ✅ | ❌ | |
| Webhooks | View webhooks | ✅ | ✅ | ❌ | ❌ | ❌ |
| Create/Delete/Update webhooks | ✅ | ✅ | ❌ | ❌ | ❌ | |
| System | Upgrade and reboot the platform | ✅ | ✅ | ❌ | ❌ | ❌ |
| View and download system logs | ✅ | ✅ | ❌ | ❌ | ❌ | |
| View platform details and health status | ✅ | ✅ | ✅ | ✅ | ✅ | |
| Platform Status | View platform status | ✅ | ✅ | ✅ | ✅ | ✅ |
| Pipelines | View pipeline details | ✅ | ❌ | ✅ | ✅ | ✅ |
| Cancel pipeline | ✅ | ❌ | ✅ | ✅ | ❌ | |
| View and download pipeline logs | ✅ | ❌ | ✅ | ✅ | ❌ | |
| Rerun pipeline | ✅ | ❌ | ✅ | ✅ | ❌ | |
| Cancel all pipelines | ✅ | ✅ | ❌ | ❌ | ❌ | |
| Users | View all users | ✅ | ✅ | ✅ | ❌ | ❌ |
| Create/Delete/Update users | ✅ | ✅ | ❌ | ❌ | ❌ | |
| View user details | ✅ | ✅ | ✅ | ✅ | ✅ | |
| Update user details | ✅ | ✅ | ✅ | ✅ | ✅ | |
| EULA | Sign EULA | ✅ | ✅ | ✅ | ✅ | ✅ |
| Groups | View user groups | ✅ | ✅ | ✅ | ✅ | ❌ |
| Create/Delete/Update user groups | ✅ | ✅ | ❌ | ❌ | ❌ | |
| Workers | View worker details | ✅ | ❌ | ✅ | ✅ | ✅ |
| Terminate worker | ✅ | ❌ | ✅ | ✅ | ❌ | |
| Roles | View roles | ✅ | ✅ | ❌ | ❌ | ❌ |

Configuring Single Sign-On (SSO)
/ Forensic Acquisition and Investigation supports SSO integration with Azure AD, Okta (OAuth or SAML), and PingID. When SSO is configured, the Cado platform automatically creates the user at first login. By integrating SSO, you can enforce authentication mechanisms such as two-factor authentication supported by your SSO provider.
Managing Accounts
Accounts in / Forensic Acquisition and Investigation correspond to cloud accounts in AWS, Azure, or GCP that have the necessary permissions to access cloud resources. Only Administrators can manage accounts. These accounts are automatically populated when CSP credentials are added, following instructions for AWS, Azure, and GCP.
It’s recommended to perform Account Checks periodically to ensure correct permissions are in place for successful data acquisitions. See Account Check for more details.
Managing Groups
Groups allow Administrators to manage user access to investigations and cloud resources. Only Administrators can create or manage groups.
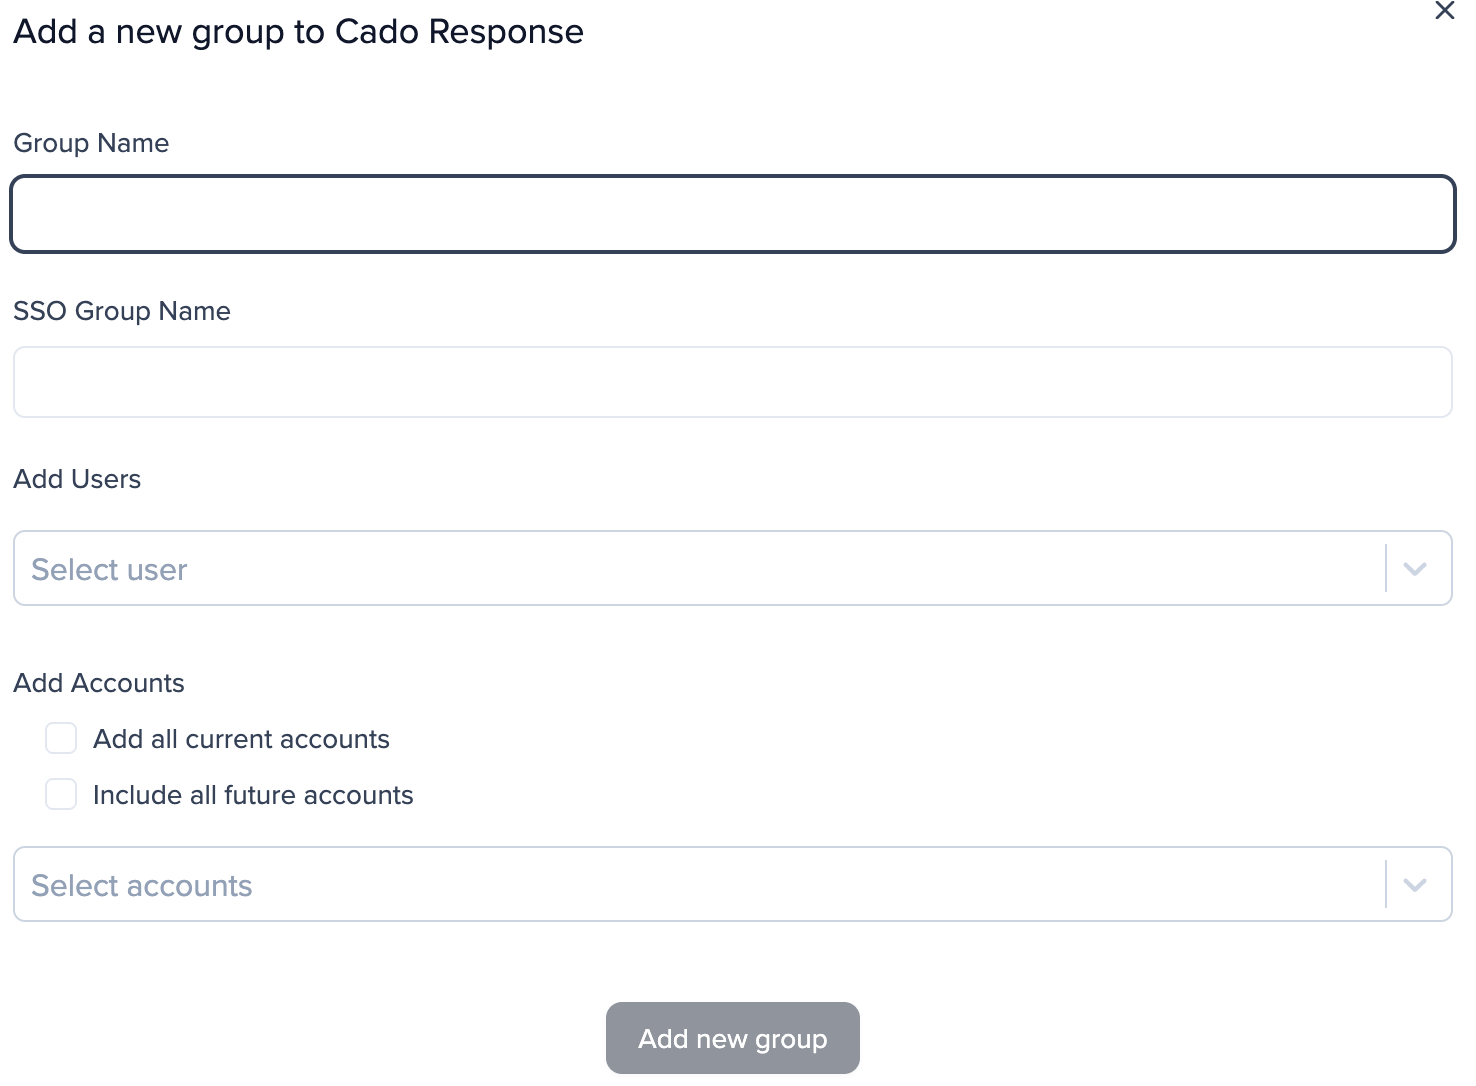
To create a new group:
- Go to Groups.
- Click Create Group.
- Enter the group name.
- Enter the corresponding SSO group name to auto-assign users who log in via SSO.
- Add required users.
- You can add accounts manually, add all existing accounts, and choose whether any future accounts should be automatically added to this group.
Creating a New User
This section is not relevant to SaaS deployments. Please use the Active AI Security Platform to manage users.
Only Administrators can create new users. When a new user is created, a temporary password must be set, which the user will be required to change upon first login.
To add a new user:
- Go to Teams.
- Click Create User.
- Assign the user a role from the dropdown
- Click Add new user
Granting Administrator Access
To grant Administrator access to a user:
- Go to Teams.
- Next to the user, click the Edit icon
 .
. - Assign the user a role from the dropdown
- Click Confirm.
Follow the principle of least privilege when creating users and assigning Administrator access.
Granting Access to an Investigation
To grant a user or group access to an existing investigation:
- Go to Investigations and select the investigation.
- Click the Investigation Settings button
- Assign Users from the dropdown
- Assign Groups from the dropdown
- Click Save Changes
Password Policy
Passwords must:
- Allow special characters.
- Be at least 8 characters long, including 1 number and 1 uppercase letter.
- Avoid commonly used passwords.